First post of the New Year, so I'm going to start as I mean to go on - with a DIY! I've made this artwork for a unit at college myself, but it would also make a really nice present for a friend or a piece of artwork to hang on the wall!
So, what you'll need:
- Photoshop Elements, or Photoshop
- An image with a very light background, and the subject in shadow
- A watercolour or painting of a nebula, or a photo of one
- Paper
- A printer
- A photo frame
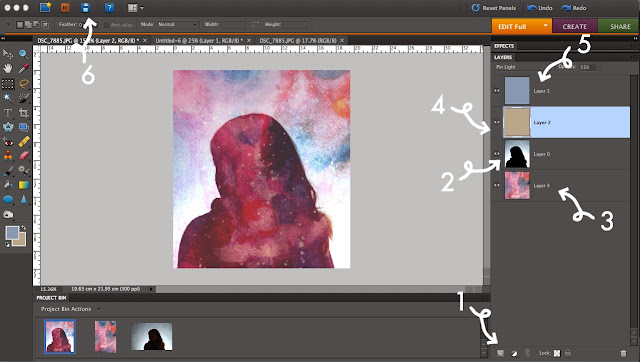
1. First, open a new document which is square in shape (I normally go for 20x20cm) and click the new layer button to add a new layer to it.
2. Copy your photograph of you or a friend onto this layer, and if necessary go to Enhance>Adjust Lighting>Levels to make the background lighter and the foreground darker. This layer should also be set to having 'Overlay' lighting using the drop down menu in the Layers toolbox.
3. Add a new layer and copy in your photograph of a nebula or a drawing of one (if you'd rather draw one, watercolours are best, because you can mix them up really well and experiment with lots of colours!). Move this layer beneath your portrait, and reduce its opacity until you are happy with how it looks.
4. Add a layer above your portrait, and fill it with a sandy, yellowy colour. Using the drop down menu again in the Layers toolbox, set it to 'pin light'.
5. Repeat step 4 but with a light blue colour, and then when you can see your picture, play with the opacity of these two coloured layers until you get the effect you want.
6. Save your picture as a .jpg file! You can then print it out, and frame it if you want (this one is particularly nice!). If you want it to be really good quality, maybe try printing it on watercolour paper or cartridge paper, or even on shiny photo paper depending on the look you want to go for!
(these are some examples of what you could end up with!)


No comments:
Post a Comment